This is Part 3 of the tutorial series. If you haven’t read Part 1: Introduction and Part 2: Tech Stack & Tooling Choices, I recommend starting there.
Now that we’ve decided on the tech stack, it’s time to actually build something. In this part, we’ll create the monorepo structure, configure our core tooling, and scaffold both the React frontend and NestJS backend. By the end, you’ll have a working development environment where both apps run side by side.
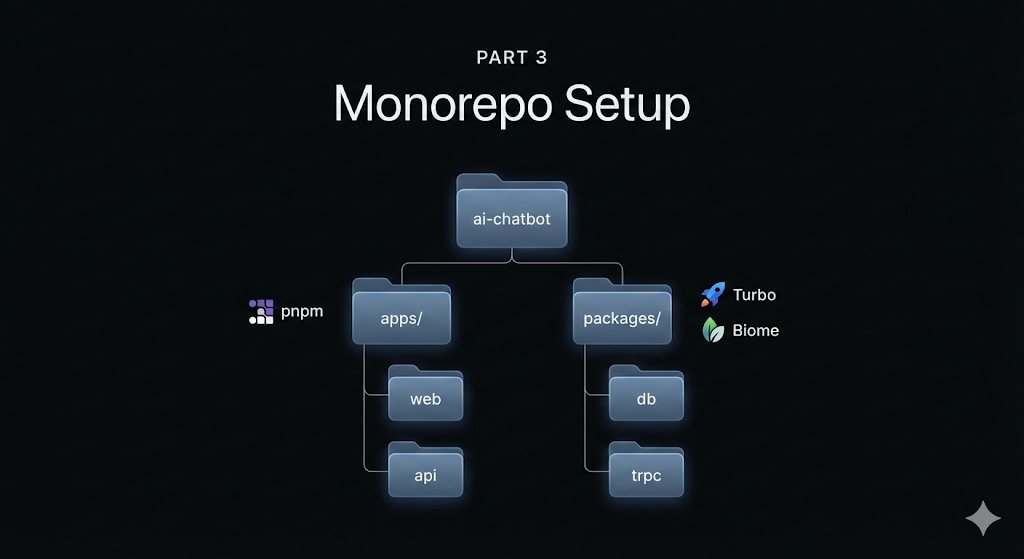
Creating the Monorepo Foundation
Let’s start by creating the project and initializing it with pnpm:
mkdir ai-chatbot
cd ai-chatbot
pnpm init
This creates a basic package.json. Now let’s set up the directory structure that will house our applications and shared packages:
ai-chatbot/
├── apps/
│   ├── web/       # React frontend (Vite)
│   └── api/       # NestJS backend
├── packages/      # Shared packages (we'll add these in following parts)
├── pnpm-workspace.yaml
├── turbo.json
├── biome.json
└── package.json
Configuring pnpm Workspaces
Create a pnpm-workspace.yaml file in the root directory to tell pnpm which directories contain packages:
packages:
  - 'apps/*'
  - 'packages/*'
This configuration tells pnpm to treat any directory inside apps/ or packages/ as a workspace package. This means packages can reference each other, and dependencies are hoisted efficiently to reduce duplication.
Setting Up Development Tooling
Now let’s add our core development tools. We’ll use Turbo as our task runner and Biome for linting and formatting.
pnpm add -D -w turbo @biomejs/biome @types/node typescriptThe -w flag adds these as workspace root dependencies, meaning they’re available to all packages in the monorepo.
Turbo Configuration
Create a turbo.json file in the root directory:
{
  "$schema": "./node_modules/turbo/schema.json",
  "ui": "tui",
  "tasks": {
    "dev": {
      "cache": false,
      "persistent": true
    },
    "build": {
      "dependsOn": ["^build"],
      "outputs": ["dist/**"]
    },
    "lint": {},
    "lint:fix": {},
    "type-check": {
      "dependsOn": ["^build"]
    }
  }
}
A few things worth noting here:
"ui": "tui"gives us a nice terminal UI during development"cache": falseon dev tasks because they’re persistent processes that don’t produce cacheable output"dependsOn": ["^build"]ensures packages build in dependency order (if package A depends on package B, B builds first)
Biome Configuration
Create a biome.json file in the root:
{
  "$schema": "./node_modules/@biomejs/biome/configuration_schema.json",
  "linter": { "enabled": true },
  "formatter": {
    "enabled": true,
    "indentStyle": "space",
    "indentWidth": 2
  },
  "assist": {
    "actions": {
      "source": {
        "organizeImports": "on"
      }
    }
  }
}
That’s it for Biome. No plugin hell, no extends chains, no compatibility issues. One file, sensible defaults, done.
Setting Up Git
Create a .gitignore file in the root:
# Dependencies
node_modules
.pnpm-store

# Logs
logs
*.log
npm-debug.log*
yarn-debug.log*
yarn-error.log*
pnpm-debug.log*

# Build outputs
dist
build
out

# Turbo
.turbo

# Environment files
.env
.env.local
.env.*.local
*.local

# Editor directories and files
.vscode/*
!.vscode/extensions.json
.idea
.DS_Store
*.suo
*.ntvs*
*.njsproj
*.sln
*.sw?
Now let’s initialize git and make our first commit:
git init
git add .
git commit -m "Initial monorepo setup"
Creating the React Client
Let’s scaffold our React frontend. We’ll use Vite with the React Compiler for optimal performance:
mkdir -p apps
cd apps
pnpm create vite
When prompted:
- Project name:
web - Framework: React
- Variant: TypeScript + React Compiler
- Use rolldown-vite: Yes (experimental but fast)
cd webSince we’re using Biome for linting, let’s remove ESLint and its dependencies:
rm eslint.config.js
pnpm remove @eslint/js eslint eslint-plugin-react-hooks eslint-plugin-react-refresh typescript-eslint globals
Now let’s install the dependencies we’ll actually need:
# Routing and state management
pnpm add @tanstack/react-router @tanstack/react-router-devtools

# tRPC client (we'll wire this up in Part 4)
pnpm add @trpc/client @trpc/react-query @tanstack/react-query

# Utility libraries for styling
pnpm add tailwind-merge clsx class-variance-authority lucide-react

# Dev dependencies
pnpm add -D tailwindcss @tailwindcss/vite @tailwindcss/typography
Configuring Tailwind CSS
Update vite.config.ts to include the Tailwind plugin:
import tailwindcss from '@tailwindcss/vite'
import react from '@vitejs/plugin-react'
import { defineConfig } from 'vite'

export default defineConfig({
  plugins: [
    react({
      babel: {
        plugins: [['babel-plugin-react-compiler']],
      },
    }),
    tailwindcss(),
  ],
})
Replace the contents of src/index.css with:
@import "tailwindcss";You can also clean up the default Vite files. Remove src/App.css and update src/App.tsx to something simple:
function App() {
  return (
    <div className="min-h-screen bg-gray-100 flex items-center justify-center">
      <div className="text-center">
        <h1 className="text-4xl font-bold text-gray-900">AI Chatbot</h1>
        <p className="mt-2 text-gray-600">Client is running!</p>
      </div>
    </div>
  )
}

export default App
Update the package.json scripts to align with our Turbo tasks:
{
  "name": "@ai-chatbot/web",
  "scripts": {
    "dev": "vite",
    "build": "tsc -b && vite build",
    "preview": "vite preview",
    "lint": "biome check .",
    "lint:fix": "biome check --write .",
    "type-check": "tsc --noEmit"
  }
}
Creating the NestJS Server
Now let’s create our backend. Head back to the apps directory:
cd ../
pnpm create nest api
cd api
The generated project is pretty minimal without ESLint or Prettier configured, which is exactly what we want since we’re using Biome at the root.
Install the additional dependencies we’ll need:
# Config management
pnpm add @nestjs/config

# tRPC server (we'll wire this up in Part 4)
pnpm add @trpc/server zod
Update the package.json to use our monorepo naming convention and align the scripts with Turbo:
{
  "name": "@ai-chatbot/api",
  "version": "1.0.0",
  "main": "dist/src/main",
  "scripts": {
    "dev": "nest start --watch",
    "build": "nest build",
    "start": "nest start",
    "start:prod": "node .",
    "lint": "biome check .",
    "lint:fix": "biome check --write .",
    "type-check": "tsc --noEmit"
  }
  ...
}
The key changes:
- Renamed to
@ai-chatbot/apiso it can be referenced by other workspace packages - Added
devscript (Turbo looks for this) - Added
lint,lint:fix, andtype-checkscripts to match our root Turbo tasks
Root Package Scripts
Now let’s update the root package.json to tie everything together:
{
  "name": "ai-chatbot",
  "version": "1.0.0",
  "main": "index.js",
  "scripts": {
    "dev": "turbo dev",
    "build": "turbo build",
    "lint": "turbo lint",
    "lint:fix": "turbo lint:fix",
    "type-check": "turbo type-check"
  },
  "packageManager": "pnpm@10.24.0",
  "devDependencies": {
    "@biomejs/biome": "^2.3.10",
    "@types/node": "^25.0.3",
    "turbo": "^2.7.2",
    "typescript": "~5.9.3"
  }
}
Running the Development Environment
Let’s make sure everything works. From the root directory:
pnpm install
pnpm dev
Turbo will start both applications in parallel. You should see:
- The React client at
http://localhost:5173 - The NestJS server at
http://localhost:3000
If you open the client in your browser, you should see our simple “AI Chatbot - Client is running!” message. And if you hit http://localhost:3000 you should see NestJS’s default “Hello World!” response.
What We’ve Accomplished
In this part, we’ve set up the foundation:
- ✅ Monorepo Structure: pnpm workspaces with
apps/andpackages/directories - ✅ Development Tooling: Turbo for task orchestration, Biome for linting/formatting
- ✅ React Client: Vite + React + TypeScript + Tailwind CSS + React Compiler
- ✅ NestJS Server: TypeScript backend ready for our API
- ✅ Unified Scripts: Single
pnpm devcommand starts everything
The apps are running independently for now. They can’t talk to each other yet, and we don’t have a database. That’s what Part 4 is for.
Next Steps
In Part 4, we’ll add the pieces necessary to handle the database layer in the project:
- PostgreSQL database running in Docker
- Prisma ORM for type-safe database access
📁 Repository State: The current state of the codebase described in this article is available in the
feat/monorepo-setupbranch on GitHub.